ආර්ඩියුනෝ මගින් TV Screen එකක් හසුරවමු

";


මම මේ ලිපියෙන් කියාදෙන්න බලාපොරොත්තු වෙන්නේ, ආර්ඩියුනෝ බෝඩ් එකක් භාවිතා කරලා TV screen එකක් පාලනය කරන ආකාරයයි.  Arduino වලට දැනට පුළුවන් වෙන්නේ  Black & White රූප නිර්මාණය කරන්න විතරයි.  ඒත් ඒක වුණත් ගොඩක් ප්‍රයෝජනවත් දේවල් වලට යොදාගන්න පුළුවන් වෙයි.

මේකට පොඩිම පොඩි components ටිකක් ඕන වෙනවා. මෙන්න ලැයිස්තුව :

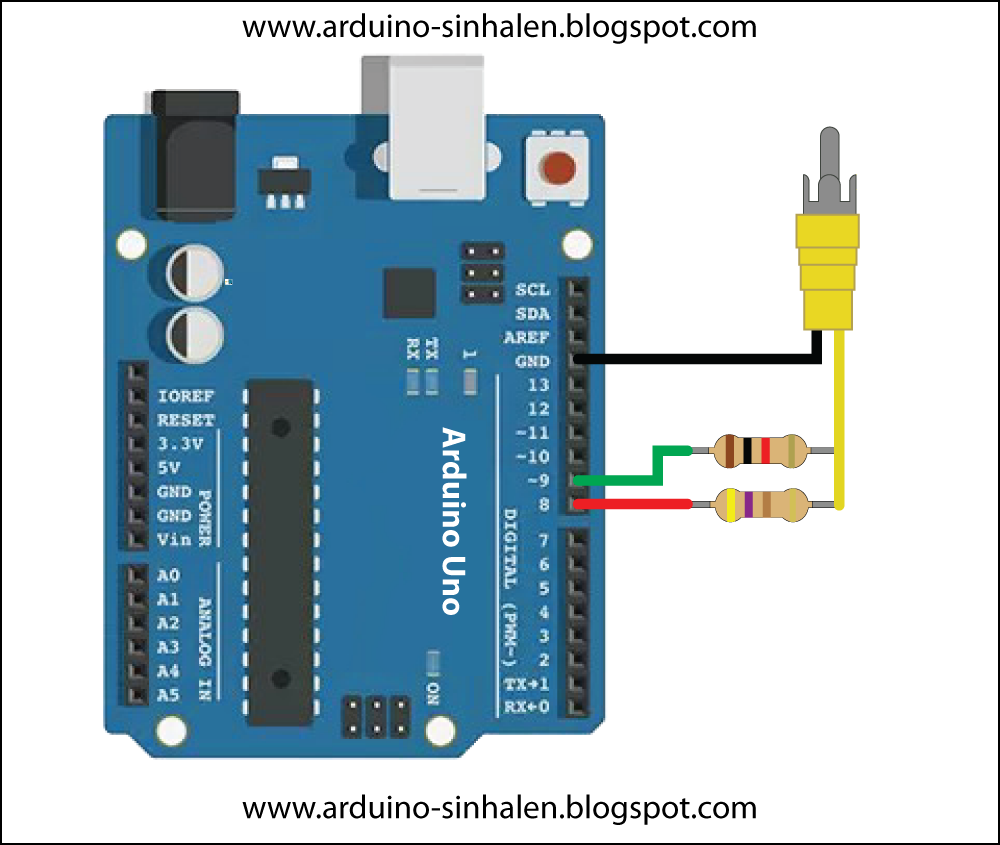
  • Arduino Board (Arduino Uno)
  • Television
  • Resistors 
  1. 470 Ohm (Yellow, Purple, Brown)
  2. 1 kOhm (Brown, Black, Red)
  • Circuit Wire
  • RCA Plug or Cable 


මෙන්න මේ ටික හොයාගෙන Breadboard එකක හරි Vero Board එකක හරි Circuit එක හදාගන්න.

Arduino Uno :

  • Sync - pin 9
  • Video - pin 8


මේ තියෙන්නේ මම හදාගත්ත  එක.


දැන් සියල්ල ලෑස්තියි. අපි බලමු ඊළගට මොනාද කරන්න තියෙන්නේ කියලා.

පහත ලින්ක් එකෙන් Arduino TVout කියන Library එක download කරගන්න. (මේ තියෙන්නේ Original Library) එක. ඒත් ඒකේ ගොඩක් අඩුපාඩු තිබුණ නිසා මම පොඩ්ඩක් ඒක වෙනස් කරලා හදපු  එක තමයි දෙන්නේ. දැනට Arduino Uno වල විතරයි Check කළේ. ගැටළුවක් ඇතිවුණොත් Comment එකක් දාන්න.)

Download Arduino TVout library (53.1 KB)

ZIP ෆයිල් එක download කරගෙන, My Documents වල තියෙන Arduino\libraries\  කියන ෆෝල්ඩර් එකට copy කරගන්න. නැතිනම් පහත පියවර වලට අනුව library එක add කරගන්න.


මම පාවිච්චි කළේ Arduino 1.6.6 IDE එක. ඊට කලින් සංස්කරණවල මේක හරියට වැඩකළේ නැත්නම් මේ ලින්ක් එකෙන් Arduino 1.6.6 (80.3 MB) ඩවුන්ලෝඩ් කරගන්න.

ඊළගට මේ code එක compile කරලා බෝඩ් එකට upload කරන්න.


#include <TVout.h>

TVout TV;
unsigned char x, y;

void setup()  {

  int r = TV.begin(_PAL);

  TV.clear_screen();
  x = TV.horz_res() - 10;
  y = TV.vert_res() - 10;

  //Outer box
  TV.draw_box(5, 5, x, y, WHITE, WHITE, 0, 1) ;

  //Inner box
  TV.draw_box(8, 8, x - 6, y - 6, WHITE, BLACK, 5, 1) ;

  //Line
  TV.draw_line(12, 20, x - 2, 20, WHITE) ;

  //Text
  TV.select_font(FONT_LARGE);
  TV.print_str(18, 10, "Arduino - TV");

  TV.select_font(FONT_DEFAULT);
}

String text = "  arduino-sinhalen.blogspot.com  ";

void loop() {

  for (int i = 0; i < 16; i++) {

    TV.draw_box(12, 50, x - 12, 10, BLACK, BLACK, 0, 1) ;
    for (int j = 0; j < 18; j++) {
      char c = text.charAt(j + i);
      TV.print_char(12 + 6 * j, 50, c);
    }
    TV.delay_frame(20);
  }
  TV.delay_frame(100);

  for (int i = 15; i >= 0; i--) {
    TV.draw_box(12, 50, x - 12, 10, BLACK, BLACK, 0, 1) ;

    for (int j = 0; j < 18; j++) {
      char c = text.charAt(j + i);
      TV.print_char(12 + 6 * j, 50, c);
    }
    TV.delay_frame(20);
  }
  TV.delay_frame(100);

}


Download program


දැන් ඔයාලට බලාගන්න පුළුවන් Arduino බෝඩ් එකෙන් ලස්සනට රූපවාහිනි තිරය මත රූප මවන හැටි.


Library එකේ  functions ගැන මෙන්න කෙටි හැදින්වීමක්.


horz_res()
(default - 128)

vert_res()
(default - 96)

delay_frame(time)
clear_screen()
 
set_pixel(x,y,color)    
(0=black, 1=white)

draw_line(x1,y1,x2,y2,color) 
(c-color 1=white, 0=black, 2=invert)

TV.draw_box(x0, y0, x1, y1, c, d, e, f)
(c-color 1=white, 0=black, 2=invert)
(d-fill 0=black, 1=white, 2=invert,3=no fill)
(e-radius for rounded box)
(f-safe draw or not, 1 = safe)

draw_circle(x0, y0, radius, c, d, h)
(c-color 1=white, 0=black, 2=invert)
(d-fill 0=black, 1=white, 2=invert,3=no fill)
(h-safe draw or not, 1 = safe)

print_char(x,y,c)
(c-character)
(x must be multiple of 8)

print_str(x,y,string)

fill(c)
(c-color 1=white, 0=black, 2=invert)

select_font(s);
(s- _5X7,_8X8,_3X5)

tone(freq,duration)
(duration in ms)


ඔයාලට දැන් පුළුවන් මේවා භාවිතා කරලා අළුත් දෙයක් කරන්න. මම පොඩි අදහසක් දෙන්නම්, උත්සාහ කරලා බලන්න Arduino Game Console එකක් හදන්න.

ඔයාලගේ අදහස් හා යෝජනා තියෙනවා නම් comment එකක් දාන්න.


LED Fire Effect - ගිනි මැලයක් හදමු

";

මම අද බලාපොරොත්තු වෙන්නේ ආර්ඩියුනෝ බෝඩ්  එකක් මගින්  LED ගිනි මැලයක් (Fire Effect) නිර්මාණය කරගන්නේ කොහොමද කියලා කියාදෙන්නයි.

මේකට අවශ්‍ය උපකරණ හා උපාංග ලැයිස්තුව මෙන්න

  • Arduino Board
  • Breadboard
  • Yellow LED - 2
  • Red LED - 1
  • 150 ohm resistors - 3
  • Circuit Wires


LED හා  Resistors ටික මේ රූපසටහනේ විදිහට අමුණාගන්න.දැන් පරිගණකය ඔන් කරලා Arduino IDE එක විවෘත කරගන්න.

අලුතින් sketch එකක් ආරම්භ කරගන්න. මම ඒක fire-effect.ino කියන නමින් save කරගත්තා.

දැන් පහත code එක ටයිප් කරන්න. නැත්නම් copy paste කරන්න.


int ledPin1 = 9;
int ledPin2 = 10;
int ledPin3 = 11;

void setup()
{
  pinMode(ledPin1, OUTPUT);
  pinMode(ledPin2, OUTPUT);
  pinMode(ledPin3, OUTPUT);
}

void loop()
{
  analogWrite(ledPin1, random(120) + 135);
  analogWrite(ledPin2, random(120) + 135);
  analogWrite(ledPin3, random(120) + 135);
  delay(random(100));
}


දැන් මේ sketch එක බෝඩ් එකට upload කරගන්න. ඔයාලා හැම දෙයක්ම හරියටම කරලා තියෙනවා නම් දැන් ඔයාලට ලස්සන ආලෝක සංදර්ශනයක් දැකගන්න ලැබේවි. කළුවර තැනකට අරන් ගියොත් වඩාත් ලස්සනට මේ fire effect එක නරඹන්න පුළුවන්.


දැන් අපි සාකච්ඡා කරලා බලමු කොහොමද මේක වැඩකරන්නේ කියලා.

int ledPin1 = 9;
int ledPin2 = 10;
int ledPin3 = 11;

මුලින්ම මම කළේ LED වලට යොදාගන්න pin වලට නම් ලබාදුන්න එක. මේකට මම int වර්ගයේ විචල්‍ය 3 ක් පාවිච්චි කළා.

  pinMode(ledPin1, OUTPUT);
  pinMode(ledPin2, OUTPUT);
  pinMode(ledPin3, OUTPUT);

වැඩහටහන ආරම්භයේදී ම මම LED වලට පාවිච්චි කරන pin 3, ප්‍රතිදාන(output) අග්‍ර විදිහට හදුන්වා දුන්නා. මම ප්‍රතිදාන අග්‍ර විදිහට පාවිච්චි කළේ PWM පහසුකම තියෙන අග්‍ර 3ක්. PWM  කියන්නේ Pulse Width Modulation කියන එකයි. අපිට මේ පහසුකම තියෙන අග්‍ර වලට විතරයි analogWrite() කියන function එක පාවිච්චි කරන්න පුළුවන්කම තියෙන්නේ.

  analogWrite(ledPin1, random(120) + 135);
  analogWrite(ledPin2, random(120) + 135);
  analogWrite(ledPin3, random(120) + 135);

analogWrite(pin,value)  කියන්න් analog voltage එකක් අදාළ pin එකෙන් නිකුත්කරන ලෙස දෙන උපදෙසයි. අපිට මේ value එක විදිහට 0 ත් 255 ත් අතර අගයක් ලබාදෙන්න පුළුවන්. 0 කියන්නේ 0V, 255 කියන්නේ 5V කියන එක.

random() කියන function එකෙන් කරන්නේ අහඹු අගයක් ලබාදෙන එකයි. random(120) කියන එකෙන් අදහස්වන්නේ 0 ට වැඩි 120 ට අඩු ඕනෑම ඉලක්කමක් අහඹු ලෙස ලබාදෙන බවයි. LED එකක් දැල්වෙන්න 1.5-3 V අතර අගයක් අවශ්‍ය නිසා analogWrite() වල අඩුම අගය විදිහට 135 ක් ලැබෙන්න තමයි random(120) + 135) කියලා ලියලා තියන්නේ.

random එක 0 වනවිට analogWrite එකේ value එන වෙන්නේ 135. මේ උපක්‍රමය හින්දා LED 3 ම එකදිගටම දැල්වෙමින් තියෙනවා. ඒත් analogWrite අගය වෙනස් වෙනනිසා ඒවයේ brightness එක වෙනස් වෙනවා. මේ විදිහට තමයි ලස්සන Fire effect එකක් ලැබෙන්නේ.

රතු, තැඹිලි, කහ LED කීපයක් ම පාවිච්චි කළොත් වඩාත් ලස්සන ගිනිමැලයක් නිර්මාණය කරගන්න පුළුවන්.  ඔබත් උත්සාහ කරලා බලන්න.


Getting started with Arduino


In its simplest form, an Arduino is a tiny computer that you can program to process inputs and outputs going to and from the chip.

The Arduino is what is known as a Physical or Embedded Computing platform, which means that it is an interactive system, that through the use of hardware and software can interact with itʼs environment.

For example, a simple use of the Arduino would be to turn a light on for a set period of time, let's say 30 seconds, after a button has been pressed (we will build this very same project later in the book). In this example, the Arduino would have a lamp connected to it as well as a button. The Arduino would sit patiently waiting for the button to be pressed. When you press the button it would then turn the lamp on and start counting. Once it had counted 30 seconds it would then turn the lamp off and then carry on sitting there waiting for another button press. You could use this set-up to control a lamp in an under-stairs cupboard for example. You could extend this example to sense when the cupboard door was opened and automatically turn the light on, turning it off after a set period of time.

The Arduino can be used to develop stand-alone interactive objects or it can be connected to a computer to retrieve or send data to the Arduino and then act on that data (e.g. Send sensor data out to the internet). The Arduino can be connected to LED's. Dot Matrix displays, LED displays, buttons, switches, motors, temperature sensors, pressure sensors, distance sensors, webcams, printers, GPS receivers, ethernet modules

The Arduino board is made of an an Atmel AVR Microprocessor, a crystal or oscillator (basically a crude clock that sends time pulses to the microcontroller to enable it to operate at the correct speed) and a 5-volt linear regulator. Depending on what type of Arduino you have, you may also have a USB connector to enable it to be connected to a PC or Mac to upload or retrieve data. The board exposes the microcontroller's I/O (Input/Output) pins to enable you to connect those pins to other circuits or to sensors, etc.


To program the Arduino (make it do what you want it to) you also use the Arduino IDE (Integrated Development Environment), which is a piece of free software, that enables you to program in the language that the Arduino understands. In the case of the Arduino the language is C. The IDE enables you to write a computer program, which is a set of step-bystep instructions that you then upload to the Arduino. Then your Arduino will carry out those instructions and interact with the world outside. In the Arduino world, programs are known as ?Sketches'. The Arduino hardware and software are both Open Source, which means the code, the schematics, design, etc. are all open for anyone to take freely and do what they like with it.  

This means there is nothing stopping anyone from taking the schematics and PCB designs of the Arduino and making their own and selling them. This is perfectly legal, and indeed the whole purpose of Open Source, and indeed the Freeduino that comes with the Earthshine Design Arduino Starter Kit is a perfect example of where someone has taken the Arduino PCB design, made their own and are selling it under the Freeduino name. You could even make your own Arduino, with just a few cheap components, on a breadboard.

The only stipulation that the Arduino development team put on outside developers is that the Arduino name can only be used exclusively by them on their own products and hence the clone boards have names such as Freeduino, Boarduino, Roboduino, etc. As the designs are open source, any clone board, such as the Freeduino, is 100% compatible with the Arduino and therefore any software, hardware, shields, etc. will all be 100% compatible with a genuine Arduino.

The Arduino can also be extended with the use of ?Shields' which are circuit boards containing other devices (e.g. GPS receivers, LCD Displays, Ethernet connections, etc.) that you can simply slot into the top of your Arduino to get extra functionality. You don't have to use a shield if you don't want to as you can make the exact same circuitry using a breadboard, some veroboard or even by making your own PCB's. There are many different variants of the Arduino available. The most common one is the Diecimila or the Duemilanove. You can also get Mini, Nano and Bluetooth Arduino's.  


New to the product line is the new Arduino Mega with increased memory and number of I/O pins.

Probably the most versatile Arduino, and hence the reason it is the most popular, is the Duemilanove. This is because it uses a standard 28 pin chip, attached to an IC Socket. The beauty of this systems is that if you make something neat with the Arduino and then want to turn it into something permanent (e.g. Or understairs cupboard light), then instead of using the relatively expensive Arduino board, you can simply use the Arduino to develop your device, then pop the chip out of the board and place it into your own circuit board in your custom device. You would then have made a custom embedded device, which is really cool. Then, for a couple of quid or bucks you can replace the AVR chip in your Arduino with a new one. The chip must be pre-programmed with the Arduino Bootloader to enable it to work with the Arduino IDE, but you can either burn the Bootloader yourself if you purchase an AVR Programmer, or you can buy these preprogrammed from many suppliers around the world. Of course, Earthshine Design provide preprogrammed Arduino chips in it' store for a very reasonable price.

If you do a search on the Internet by simply typing ? Arduino' into the search box of your favourite search engine, you will be amazed at the huge amount of websites dedicated to the Arduino. You can find a mind boggling amount of information on projects made with the Arduino and if you have a project in mind, will easily find information that will help you to get your project up and running easily.


The Arduino is an amazing device and will enable you to make anything from interactive works of art to robots. With a little enthusiasm to learn how to program the Arduino and make it interact with other components a well as a bit of imagination, you can build anything you want.

This book and the kit will give you the necessary skills needed to get started in this exciting and creative hobby.

So, now you know what an Arduino is and what you can do with it, let's open up the starter kit and dive right in.